Millions of people experience shoulder pain each year. Whether it’s due to an injury, overuse, or arthritis, the discomfort can be overwhelming. If you’re among them, don’t worry—yoga can be a great solution! In this article, we’ll explore the best yoga poses for shoulder pain. These exercises aim to relieve discomfort and enhance your range of motion. So, if you’re seeking a natural way to alleviate your shoulder pain, yoga is the answer!
This post may include affiliate links, which help keep our content free. Please read our disclosure for more information.
Shoulder pain is a common issue, often caused by poor posture, repetitive movements, or muscle imbalances. Yoga can effectively address this pain. By combining stretching, strengthening, and breathing exercises, yoga helps release tension in the shoulders and improve mobility. It can also enhance posture and increase awareness of how we carry ourselves throughout the day.
Many yoga poses can benefit shoulder pain, with some of the most effective being the cat-cow pose, downward-facing dog pose, and eagle pose. Regular practice of these poses can help reduce pain and stiffness in the shoulders while improving overall mobility.
Before we dive into the yoga poses for shoulder pain, let’s briefly discuss what causes this discomfort. Shoulder pain can arise from various factors. The shoulder is a complex joint formed by the interaction of three bones: the scapula, clavicle, and humerus. It’s supported by a network of muscles, ligaments, and tendons. Due to its complexity, the shoulder is prone to various injuries and anatomical issues that can lead to pain.
Common causes of shoulder pain include rotator cuff injuries, bursitis, impingement syndrome, and adhesive capsulitis. Less common causes may involve fractures, dislocations, and tumors. In many cases, shoulder pain can be managed with conservative treatments like ice, rest, and physical therapy. However, more severe cases might require surgery. A thorough evaluation by a qualified physician is the best way to identify the cause of shoulder pain and create an effective treatment plan.
These stretching exercises target the muscles and joints around the shoulder, helping to relieve tension and improve mobility. To perform a basic shoulder roll, sit up straight with relaxed shoulders. Slowly roll your shoulders forward and backward several times. You can also try rolling your shoulders in circles or side to side. Shoulder rolls are excellent for releasing tension in the neck and shoulders and can also enhance your posture. So, the next time you’re feeling tense, give a few shoulder rolls a try—you’ll be amazed at how much they can help reduce stress.
To do a yoga neck roll, sit comfortably with a straight spine. Slowly roll your head to the right, leading with your chin. Continue rolling until your head is facing behind you. Hold this position for a few deep breaths before gently rolling back to the starting position. Repeat on the other side. Remember to move slowly and mindfully, focusing on your breath throughout the exercise. If you experience any pain or discomfort, stop immediately and consult your doctor or a qualified yoga instructor.
For this stretch, sit up straight. Extend your right arm across your chest with your palm facing backward. Use your left arm to grasp your right arm at the elbow and pull it closer to your body. Hold the stretch for several seconds, feeling it through your shoulder and shoulder blade. These yoga stretches can help relieve shoulder pain and enhance mobility. Practice them regularly to keep your shoulders healthy and strong.
There are many yoga poses for shoulder pain that can help stretch and strengthen the muscles. These poses are beneficial for those looking to improve flexibility and overall strength. To start, come onto all fours with your hands and knees shoulder-width apart. Inhale as you arch your back and look up toward the ceiling, allowing your belly to drop toward the floor—this is Cow Pose. On the exhale, round your back, tuck your chin to your chest, and move into Cat Pose. Continue alternating between these two poses, moving with your breath for 5-10 deep inhales and exhales. The Cat/Cow Pose not only helps with shoulder pain but also massages the organs in the belly and improves circulation throughout the body.
The Downward Dog Pose is a fundamental yoga pose that offers numerous benefits, including improved flexibility and stress relief. To perform this pose, start in a standing position with your feet hip-width apart. As you exhale, bend forward at the hips and place your hands on the ground shoulder-width apart. Walk your hands forward until your body forms an inverted V shape. Ensure your arms are straight and your heels press into the ground. To deepen the stretch, press your pelvis toward the ceiling and lengthen your spine. Hold the pose for five to ten breaths before slowly returning to standing.
The Eagle Pose is excellent for stretching the muscles and tendons around the shoulder. It can also enhance your range of motion and flexibility. To perform the Eagle Pose, stand with your feet together. Raise your right arm and wrap it around your left arm, bringing your palms together. Bend your knees and lower yourself into a squatting position. Remember to keep your spine straight and breathe smoothly throughout the stretch. With practice, you’ll achieve deeper stretches and enjoy all the benefits this pose offers.
The Thread the Needle is a restorative yoga pose often used to relieve neck and shoulder pain. To perform it, lie on your back on a mat with your knees bent and feet flat on the ground. Take a deep breath in, and as you exhale, lift your right leg and thread it under your left leg, allowing your right knee to rest on the ground. Extend your right arm out to the side and place your left hand on your right thigh. Gently pull your right thigh toward you, using your left hand for support. Hold the pose for several deep breaths before repeating on the other side.
The Cobra Pose is an excellent yoga move for shoulder pain! To perform it, lie flat on your stomach with your legs extended behind you and palms flat on the floor next to your chest. Inhale as you slowly lift your head and chest off the floor, letting your shoulders and upper back do the work. Keep your elbows close to your body and avoid arching your lower back. Hold the pose for a few breaths, then slowly lower yourself back down. With regular practice, you’ll notice a significant reduction in shoulder pain.
The Bridge Pose is a great way to stretch the shoulders and chest while also strengthening the back and legs. To begin, lie on your back with your knees bent and feet flat on the floor. Place your arms at your sides, palms down. Inhale as you press your feet into the floor and lift your hips upward. Keep your thighs parallel as you exhale and extend your chest forward. Once you’re in a comfortable position, hold the pose for several breaths. To release, exhale and slowly lower your hips to the floor.
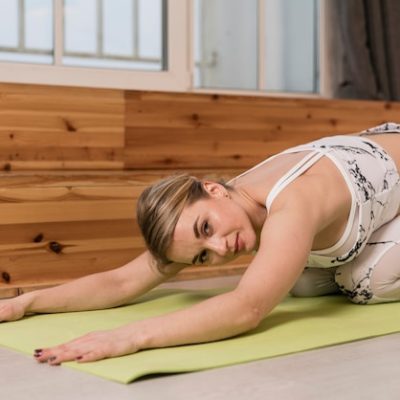
The Puppy Pose is a restorative yoga pose that can help relieve pain in the shoulders, neck, and upper back. To get into the pose, start on all fours with your hands and knees shoulder-width apart. As you exhale, walk your hands forward until your forehead rests on the mat. Relax your shoulders and allow your upper back to round. You can stay in this position for as long as you like, breathing deeply and allowing your body to relax. To release the pose, simply walk your hands back to your knees and sit up tall. The Puppy Pose is a simple yet effective way to stretch the muscles around the shoulder girdle and relieve upper body pain. Try this pose next time you’re feeling tightness in your shoulders.
For many, starting a yoga practice is the easy part; the challenge lies in maintaining it. However, there are a few strategies to ensure you get the most out of your practice and keep returning for more. First, be realistic about how often you can practice. Trying to do too much too soon may lead to burnout and quitting altogether. It’s better to start slowly and gradually increase your frequency as you see results. Second, find a style of yoga that suits you and your goals. With many different types of yoga available, you’re sure to find one that fits you well. If you’re unsure where to begin, try attending a few different classes until you find one that feels right. Lastly, don’t hesitate to ask for help. If you’re struggling with a specific pose or aspect of your practice, seek guidance from a teacher or experienced practitioner. By following these tips, you’ll be on your way to developing a strong and sustainable yoga practice.
With all the incredible benefits a regular yoga routine can offer, who wouldn’t want to start a daily practice? We understand that the hardest part of any exercise routine is getting started and committing to it, especially if you’re a beginner. You might have a few questions, and probably some others too! That’s why we created our Yoga Fat Loss Bible. It’s the ultimate guide to getting started with yoga, helping you become flexible, tone your body, and relieve aches and pains through gentle yoga practice. We provide detailed instructions and beginner modifications for your practice, along with a 6-Week Workout Plan suitable for any beginner! It also includes a free meditation guide for beginners to help you let go of worries and relieve stress and anxiety. You can check it out by clicking here!
Always remember that the most challenging part of any yoga routine is simply showing up. Make sure to show up today and give your best to your new daily yoga practice. You deserve it! If you enjoyed this article on practicing yoga every day or have any questions for us, please leave them in the comment section below!


